FinderCam with Plate Solving Manual
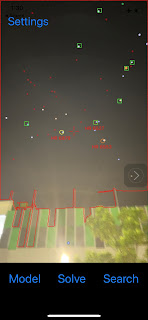
FinderCam uses a technique called plate-solving and matches 3 known stars in a star catalog. It uses your location and time to know your current sky. FinderCam is designed for use in a clear sky, partially cloudy sky, full moon, city and window. It requires at least 3 stars to work accurately. It is available for iPhone and iPad. To understand the procedure watch the demo video at https://youtube.com/shorts/si8N4MExzbQ
How to use FinderCam
The Model Button in the app displays a model of stars, planets and Messier's objects that are presently above(red) and below (grey) the horizon in your sky. You need to allow location permission during the first run of the app. Once permitted, the app will always get the phone location and time. Then it will update the sky model every minute. Tap at the sky object to reveal its name. Tap again to display the green guide path from your phone pointing to the sky object.
Tap the Solve Button to identify 3 bright stars. It will also update the sky model so that the star positions in the phone camera image will match those in the sky model.
The Search Button directs you to choose a sky object. You need only to move your phone to follow the green guide-path as shown on the app screen to your target. As you move within 10 degrees of the target, it will automatically plate solve to accurately point you to the target.
Tips:
- Use Custom Coordinate in Search button to enter the position of a comet or meteor shower found online. This app will show you where they are.
- To remove the green guide-path path after you get to the target, tap the Search Button and swipe down on the screen to close the search page. Or you can tap the Solve Button to remove the green guide-path.
- To avoid false star created by light from window, tree and moon, long press the screen and draw a rectangle. Only stars within the rectangle are used in the plate solving. To remove the limiting rectangle, long press and let go.
- Point your phone at a part of the sky. Tap Solve to plate solve. It aligns the sky model to the night sky accurately. Tap a target on the screen. It will display the object name. Tap the target again to display a green path to the target. Tap again to remove the path. See demo at https://youtube.com/shorts/9aZ7lwPShaA
- You can turn on the voice direction in the setting. You could listen to the app direction like what your car gps system does. Eg. Move left 20 degree.
Notes:
Plate-solving of this app works by comparing the night sky stars positions with a catalog of known star positions. It uses triangle to match the star catalog and thus gives an accurate result of the stars. It uses the Yale Bright Star Catalog, Messier's Object Catalog, Caldwell catalog and best NGC catalog.
Location Service:
Location service is required.
1. Make an estimate for the phone pointing. This can be done from the az-alt information from star maps. It is a good starting point for the plate solve to match. It is called near plate solve. In general, a blind plate solve will take longer time and has a higher chance to give a false match.
2. In order to display a live sky map turn your phone to the sky. The phone orientation, location and time are used to calculate what stars will be shown in your phone. This can be done during the day for practice by covering up the camera lens to make the screen dark. Then you will clearly see the stars and the green line when you are searching and solving. You can check for a correct sky by going to a sky map.
Periscope Lens Mode:
1. Go to setting
2. Switch on Right Angle Lens Mode
3. You will need the periscope Lens shown below. Cost US$3 in online marketplace eg. Shopee. If you use a different lens, email me with a photo. I will provide an app update.
Watch periscope lens mode video at https://youtube.com/shorts/pslR2gJBxUU
If you uses a 45 degree mirror dock (Angle between phone and mirror), select SS Mirror Mode in the settings.
Warning:
Never point your phone near or on the sun. Severe eye damage can result. Also damage to optical equipment can result.
Tutorial Videos:
In above photo, I use 2 phone adapter on a tripod with a monocular. The right adapter is for FinderCam app while the left is for RawCam app. I use FinderCam to point to a target accurately and switch to RawCam to stack the images.
Support:
Please do not hesitate to contact me at ustransit74@gmail.com for any question, feedback or issue. An attached short screenshot video of the issue will be appreciated.


Comments
Post a Comment