Posts

PushToCam vs FinderCam

These 2 apps can be used to guide you easily to your target but work in a very different way and have different requirements. They solve the problem for beginners to find night sky  objects . 1.  PushToCam  - It does not need any phone to telescope holder. It also does  not need a phone camera to work. It only needs a way to  attach the phone to the telescope in any orientation . A Velcro strap or a tie back can be used to secure the phone to the telescope. Similar to the  SkEye  android app and Starhopper web  app, it  uses  a  bright star to align the telescope to the sky model. It can be  used  in clear or light polluted environment. It uses  iPhone  compass, orientation, location and telescope alignment to guide  the use r to target.  Pro: Phone can be attached to telescope in any orientation. User  need not bend over  awkwardly to use the phone.  Method: Manual nearby star alignment.  2.  FinderCam  -  It depends on phone camera to work. It needs a phone adapter and  optional 90 d

FinderCam with Plate Solving Manual

Image
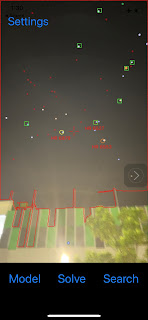
To return to the  FinderCam  app, swipe up from phone bottom edge, and select FinderCam app. FinderCam  uses a technique called plate-solving and matches 3 known stars in a star catalog. It uses your location and time to know your current sky.   FinderCam  is designed for use in a clear sky, partially cloudy sky, full moon, city and window. It requires at least 3 stars to work accurately. It is available for iPhone and iPad. To understand the procedure watch the demo video at  https://youtube.com/shorts/si8N4MExzbQ The diagram above shown a screenshot of FinderCam. The red, orange and green circles indicate which stars are solved. The green squares are the verified stars based on the solved plate. More green squares mean higher confidence in the plate solving. Behind each circle and square is a star captured by the phone camera. The red line outlines the sky region. The app can prevent false stars formed by the trees, buildings and clouds. How to use  FinderCam The Model Button i n the

Synthesia Piano Edit Manual

Thank you for using Synthesia Edit app. It lets you add, delete and move notes quickly on iPhone without transferring to your laptop. Mostly you will use this app to tidy up your recording from Synthesia Record app.  Watch videos demonstration at  https://youtu.be/HllxY_LbySY    https://youtu.be/WEOqwyDkWpI  (Updated) Direction: 1. Long press empty space for the Select All Note button. All the notes will turn yellow, and you can move them to the starting time. You can also add note to the empty space. If you only want to select a group of notes, long press empty space and move the finger to draw a rectangle over the required notes. 2. After you have done a recording, export to Synthesia Edit. You can also downloaded a midi file from safari and share it to Synthesia Edit. Lastly, you can airdrop from your Mac to iPhone, then share to  Synthesia Edit. 3. Only the first measure/bar line is adjustable. When you record in Synthesia Record, the time signature is 4/4. You can correct it to 3/

Synthesia Piano Record Manual

Thank you for using Synthesia Piano - Record. It is an easy way to record your performance. You can identify where your timing needs improvement. Once you are satisfied with your performance, you can export your song as midi file for distribution.  Direction: 1. You will need a midi controller, a piano with midi port or you can use the app on screen keyboard. 2. Connect your phone to your piano.  3. Tap Record button. Perform your pieces. Tap Stop button.  4. Tap Play button. Listen to your playing. Watch the length of the midi notes. You will find places where you are playing too fast or too slow. Work on that part of the song and do another recording!  5. Tap Song button and select the song for export to Synthesia Piano - Edit App  to tide up your midi notes.  Video: 1. Connect to your midi pi ano. https://youtu.be/M6DvWzqOaAc 2. Record your piano playing.  https://youtu.be/OMIHtaE6WFE   Tips: 1. You can connect the piano midi cable to your iPhone either before or after you start the

VideoStack For Galaxy Manual

Image
Thank you for using VideoStack for Galaxy iOS app. It is an easy way to stack your video frames into a single photo. Stacking is a way to combine the images so that noise is removed in the final image. See below 2 photos of 1 frame vs 40 frames. You can stack 30 minutes exposure or more if you have a goto telescope. On a manual telescope, you can get about a minute of exposure. Previously, in order to image the galaxy or nebulae, it is quite a long workflow. You have to take a video on your camera, upload to your computer, and use PIPP > Registax/Autostacker > GIMP to crop, stack and process the video frames. Now you can do it on your phone conveniently. Direction: 1. Use  videoCam iOS app  to take a short video of the galaxy with your telescope. In the app, adjust the exposure, frame rate and ISO and start to record a video. If you are using a goto/tracking telescope, use the longest exposure e.g. 1 second per frame. If you are using a manual scope, you can try 1.0, 0.5 second o

VideoStack For Planet Manual

Image
Thank you for using VideoStack for Planet iOS app. It is an easy way to stack your video frames into a single photo. Stacking is a way to combine the images so that noise is removed in the final image. See below 2 photos of 1 frame vs 40 frames. Previously, in order to image a planet, it is quite a long workflow. You have to take a video on your camera, upload to your computer, and use PIPP > Registax > GIMP to crop, stack and process the video frames. Now you can do it on your phone conveniently. Direction: 1. Use videoCam iOS app to take a short video of the planet with your telescope. You will need at least 130mm telescope to see some details on Jupiter. In the app, adjust the exposure, frame rate and ISO so that you can see some details on the planet and start to record a video. Save the video to your phone album. Alternatively, you can use phone native camera to record a video. However, it has less control over the video parameters.  2. Trim your video on your phone to abou

RawCam App Manual

Image
Updated 26 Feb 2024 Thank you for using RawCam(MilkyCam Raw) iOS app. It is a way to see galaxies and  nebulae in small and medium telescope. RawCam is designed for both manual and Goto telescope while the original MilkyCam and SpiralCam are designed for manual telescope.  Some Quick Settings: For manual telescope, RawCam shots are limited to the time when the sky object drift across the eye piece. To use with a manual telescope, choose 1/2 second or lower for EXP(exposure) and choose 1 frame for SUB(number of exposure in a stack).  For Goto telescope with tracking, the RawCam shots duration can be 10 minutes or more. Choose 1 second for EXP and 10-30 frames for SUB.   For stacking the Milky Way on a camera tripod with an iPhone, use 1 second for EXP and 30 frames for SUB. Eg. If you choose 10 frames for SUBS, RawCam will add the frames up until it has 10 frames. Then it starts to align the added frames with previous 10 frames. RawCam uses addition instead of average in stacking.  RawC